
Servos are a great way to add an active weapon to your basic wedge robot. They are extremely easy to integrate and can really help tip the judges decisions in your favor. You can use them for lifters, clamps, and even hammers. The only (kinda) challenge with using servos is powering them and even that isn’t that difficult.
Most of the ESCs or speed controllers used in combat robots contain a BEC or battery eliminator circuit. This circuit takes the power from the main battery and feeds it back to the receiver. This saves the weight of an additional battery just to power the receiver. Most receivers run on 5v, but some can operate on higher voltages. These BECs are great for powering the electronics in the receiver, but often times they struggle to provide the current the servos need to power hungry motors.
The easiest thing to do is power those suckers straight off the main battery. This works great, except when it doesn’t. You may be thinking “Huh?” Well you see servos are designed to run on 5v like we mentioned earlier and often times our drive motors are being run on a 2s (2 cells or 7.4v), 3s (3 cells or 11.v), or even a 4s (4 cells or 14.8v) lithium battery. Now there are lot’s of different servo options out there. Nearly all servos are designed to work on 4.8-6 volts. Some servos will work fine on 7.4v. Some may even work on 11.1v, but most will smoke. Smoking is bad. It’s bad for humans, but it’s really bad for servos. I have been using some Hitec HSR-8498HB servos in our lifter ant Mucho Destructo. As you can see by the performance data on the linked page, these servos are rated for 7.4v, so we want to run them as high as possible. (I’m working on a Motor primer in a future post that will explain why higher voltage is gooder). In the last event I plugged in the wrong battery pack (a 3s 11.1v pack) and after just a few cycles of the arm, the arm went up and stayed up and the magic smoke came out. This was clearly too high.
As I previously mentioned receivers are designed to run on 5v and some can tolerate higher voltages, but if you don’t want to risk over-volting your receiver then you can wire the servo to the battery very easily. First, you should probably know what each wire means in your servo. The wires are typically colored black/brown, red, and white/yellow/orange (depending on the manufacturer). The black or brown wire is the ground wire. This is common is low-voltage dc (direct current) circuits. The red wire is the power wire. The power to drive the motors and the circuits is carried on this wire. The white, yellow, or orange wire is the signal wire. This wire is the command wire that tells the servo which direction to go and how far it should go. There’s a lot more to cover on servos and esc signals, but that’s for a future post. See all the pretty colors.

In this case we want to remove the red (power) wire from the servo plug. This can be accomplished by using an exacto knife or other small instrument to lift the tab at the servo. There is a small catch that retains the pin at the end of the wire. Simply lift that tab and pull out the wire. See even I can do it and I didn’t even get any blood on the picture.

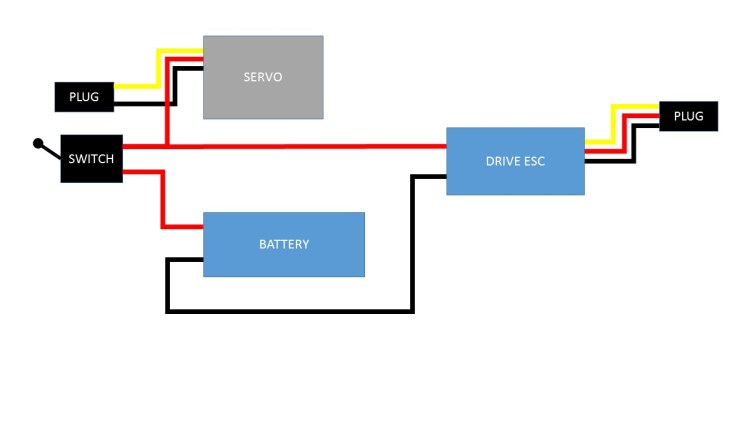
Now you can cut off that pin and strip back a small length of wire. Solder that wire to the plug that will connect to your battery. Boom you now are feeding your servo off main battery pack. If you are using a separate battery for the lifter then you will need to solder the ground wire from your battery to the ground wire of the drive ESCs. This will tie all the grounds in your system together. A picture is worth a thousand words, so check out my sweet MS Paint schematic and it will all make sense.
That should just about cover how to get your servo wired up and ready to run. I have a list of future posts to work on, but the very next one will be on some tricks I learned about lifters.
If you are still confused please comment below or check out our info on the new contact page. Also, if you have another topic that you would like to see explained (probably incorrectly) please send in those ideas as well. Oh and be certain to follow us on Facebook, Twitter, and Instagram to get the most up-to-date information.
